脚手架集成

文章目录

为什么需要脚手架?

1、减少重复性的工作,不再需要复制其他项目再删除无关代码,或者从零创建一个项目和文件 。
2、根据交互动态生成项目结构和配置文件,具备更高的灵活性和人性化定制的能力 。
3、多人协作更为方便,避免了人工传递文件的繁琐。
4、集成互联网上的模板,方便自己与他人使用。

思路

开发脚手架可以借鉴 vue-cli 的基本思路。vue-cli 是将项目模板放在 git 上,运行的时候再根据用户交互下载不同的模板,经过模板引擎渲染出来,生成项目。这样讲脚手架和模板分离,就可以各自维护,即使模板有所变动,只需要上传最新的模板即可,而不需要用户去更新脚手架就可以生成最新的项目。

脚手架工作流

network

脚手架问答流

PS D:\test> vue create demo1
1
2
3
4
5
6
7
8
9
10
11
12
13
14
15
? Please pick a preset: Manually select features
? Check the features needed for your project: Babel, Router, Vuex, CSS Pre-processors, Linter
? Use history mode for router? (Requires proper server setup for index fallback in production) Yes
? Pick a CSS pre-processor (PostCSS, Autoprefixer and CSS Modules are supported by default): Less
? Pick a linter / formatter config: Basic
? Pick additional lint features: (Press <space> to select, <a> to toggle all, <i> to invert selection)Lint on save
? Where do you prefer placing config for Babel, PostCSS, ESLint, etc.? In package.json
? Save this as a preset for future projects? Yes
? Save preset as: preset1

📄 Generating README.md...


🎉 Successfully created project demo1.
👉 Get started with the following commands:

如何搭建一个脚手架?

network

第三方库的支持

network

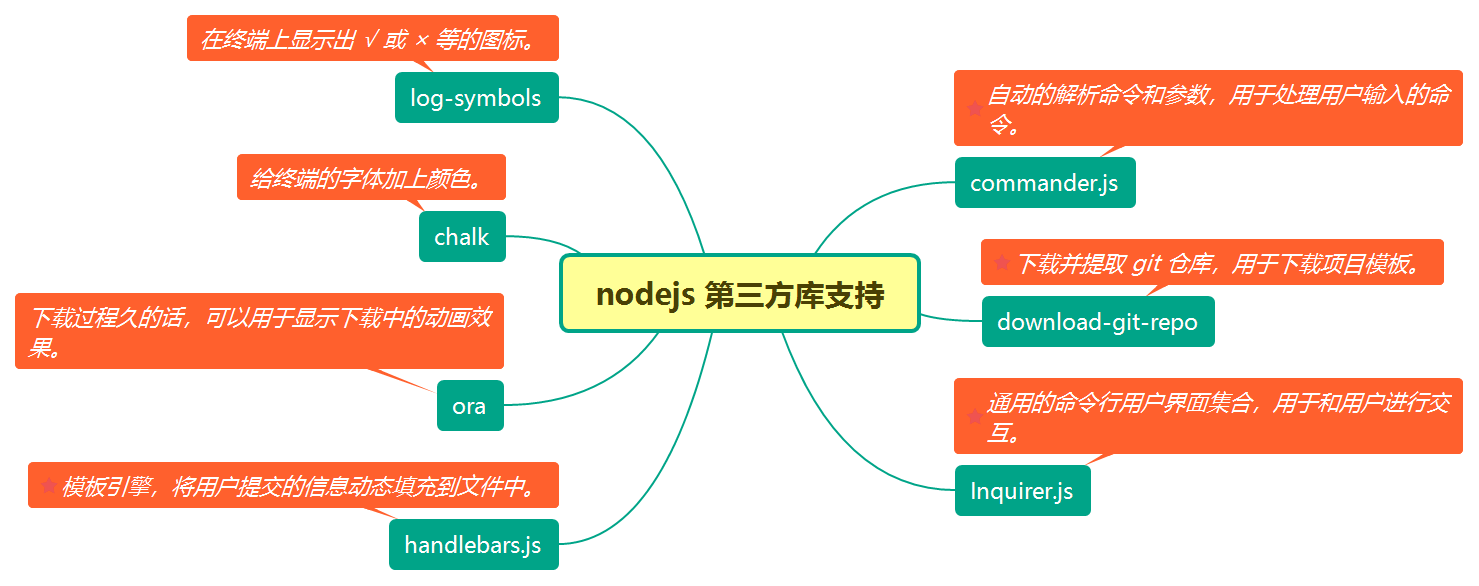
会使用到的第三方库

  • commander.js:可以自动解析命令和参数,用于处理用户输入的命令
  • download-git-repo:下载并提取 git 仓库,用于下载项目模板
  • inquirer.js:通过命令行用户界面集合,用于和用户进行交互
  • handlebars.js:模板引擎,将用户提交的信息动态填充到文件中
  • ora:下载过程久的话,可以用于显示下载中的动画效果
  • chalk:可以给终端的字体加上颜色
  • log-symbols:可以在终端上显示 √ 或 × 等图标

搭建步骤:

初始化项目

首先创建一个空项目,命名为 mbs-cli,然后新建一个 bin/mbs 文件,再执行 npm init 生成一个 package.json 文件。最后安装上面需要用到的依赖。

1
2
npm install commander download-git-repo inquirer handlebars ora chalk log-symbols cli-table -S

处理命令行

node.js 内置了对命令行操作的支持,在 package.json 中的 bin 字段可以定义命令名和关联的执行文件。

在 package.json 中加上 bin 的内容:

1
2
3
4
5
6
7
8
{
"name": “mbs-cli",
"version": "1.0.0",
"description": "中后台系统脚手架",
"bin": {
"mbs": "bin/mbs"
}
}

首先在 mbs 文件 中引入相关依赖模块:

1
2
3
4
5
6
7
8
#!/usr/bin/env node

const { existsSync } = require('fs') //系统内置模块 主要用来操作文件
const program = require('commander') //自动的解析命令和参数,用于处理用户输入的命令。
const chalk = require('chalk') //给终端的字体加上颜色。
const symbols = require('log-symbols') //在终端上显示出 √ 或 × 等的图标。

const res = (command) => resolve(__dirname, '../commands/', command)

配置 !/usr/bin/env node 的作用

指定用 node 执行脚本文件 ,usr/bin/env 解决了不同的用户 node 路径不同的问题,可以让系统动态的去查找 node 来执行你的脚本文件。

nodejs 依赖模块介绍与用法

commander(指挥官)

自动地解析命令和参数,用于处理用户输入的命令。

  • usage(): 设置 usage 值

  • command(): 定义一个命令名字

  • description(): 设置 description 值

  • option(): 定义参数,需要设置“关键字”和“描述”,关键字包括“简写”和“全写”两部分,以”,”,”|”,”空格”做分隔。

  • parse(): 解析命令行参数 argv

  • action(): 注册一个 callback 函数

  • version() : 终端输出版本号

1
2
3
4
5
6
7
8
9
10
11
12
13
PS D:\yameiproject\mbs-cli> mbs --help
Usage: mbs <command>

Options:
-V, --version output the version number
-h, --help output usage information

Commands:
add|a Add a new template
init|i Generate a new project
init|ins Generate a simple project
create|c Generate a new project
list|l List all the templates

定义常规命令:

1
2
3
4
5
const program = require('commander') //自动的解析命令和参数,用于处理用户输入的命令。

program.usage('<command>')

program.version(require('../package').version)

init 命令逻辑:

1
2
3
4
5
6
7
8
9
10
11
12
program
.command('init <name>')
.description('Generate a new project')
.alias('i')
.action((name) => {
if (!existsSync(name)) {
require(res('init'))
} else {
// 错误提示项目已存在,避免覆盖原有项目
console.log(symbols.error, chalk.red('Project already exists'))
}
})

处理用户输入命令:

1
2
3
4
5
6
7
8
9
10
11
12
program
.command('init <name>')
.description('Generate a new project')
.alias('i')
.action((name) => {
if (!existsSync(name)) {
require(res('init'))
} else {
// 错误提示项目已存在,避免覆盖原有项目
console.log(symbols.error, chalk.red('Project already exists'))
}
})

最后处理解析命令行参数 :

1
2
3
4
5
6
7
8
9
program.parse(process.argv)

//process:一个全局对象,控制有关信息,控制node.js的进程
//program.parse:解析命令之中的参数,根据上面定义好的规则执行相关命令
//process.argv:该属性返回一个数组,这个数组包含了启动node.js进程时的命令行参数

if (!program.args.length) {
program.help()
}

inquirer(询问者)

通用的命令行用户界面集合,用于和用户进行交互。由于交互的问题种类不同,inquirer 为每个问题提供很多参数:

1
2
3
4
5
6
7
8
9
10
type:表示提问的类型,包括:input, confirm, list, rawlist, expand, checkbox, password, editor;
name: 存储当前问题回答的变量;
message:问题的描述;
default:默认值;
choices:列表选项,在某些type下可用,并且包含一个分隔符(separator);
validate:对用户的回答进行校验;
filter:对用户的回答进行过滤处理,返回处理后的值;
when:根据前面问题的回答,判断当前问题是否需要被回答;
prefix:修改message默认前缀;
suffix:修改message默认后缀。

语法结构

1
2
3
4
5
6
7
8
9
const inquirer = require('inquirer')

const promptList = [
// 具体交互内容
]

inquirer.prompt(promptList).then((answers) => {
console.log(answers) // 返回的结果
})

input 类型

1
2
3
4
5
6
7
8
9
10
11
12
13
const inquirer = require('inquirer');
inquirer.prompt([
{
type: 'input',
name: 'author',
message: '请输入作者名称'
}
]).then((answers) => {
console.log(answers.author);
})

效果:

效果:

confirm 类型

1
2
3
4
5
6
7
8
9
10
11
12
13
14
15
16
17
18
const promptList = [
{
type: 'confirm',
message: '是否使用监听?',
name: 'watch',
prefix: '前缀'
},
{
type: 'confirm',
message: '是否进行文件过滤?',
name: 'filter',
suffix: '后缀',
when: function (answers) {
// 当watch为true的时候才会提问当前问题
return answers.watch
}
}
]

效果:

list 类型

1
2
3
4
5
6
7
8
9
10
11
12
const promptList = [
{
type: 'list',
message: '请选择一种水果:',
name: 'fruit',
choices: ['Apple', 'Pear', 'Banana'],
filter: function (val) {
// 使用filter将回答变为小写
return val.toLowerCase()
}
}
]

效果:

download-git-repo

download-git-repo 支持从 Github、Gitlab 和 Bitbucket 下载仓库,

1
download(repository, destination, options, callback)

repository

1
2
3
4
- GitHub - github:owner/name or simply owner/name
- GitLab - gitlab:owner/name
- Bitbucket - bitbucket:owner/name
- Direct - direct:url:branch

destination

1
The file path to download the repository to. xxxxxxxxxx 

options

1
boolean default false - If true use git clone instead of an http download. While this can be a bit slower, it does allow private repositories to be used if the appropriate SSH keys are setup.

callback

1
The callback function as function (err).

example:

1
2
3
download('direct:https://gitlab.com/flipxfx/download-git-repo-fixture/repository/archive.zip', 'test/tmp', function (err) {
console.log(err ? 'Error' : 'Success')
})

ora (loading 动效)

用于显示下载中的动画效果

1
2
3
4
5
6
7
8
const ora = require('ora')
// 开始下载
const spinner = ora('正在下载模板...')
spinner.start()
// 下载失败调用
spinner.fail()
// 下载成功调用
spinner.succeed()
1
\ Downloading template...

chalk(字体颜色)

通过 chalk 来为打印信息加上样式,比如成功信息为绿色,失败信息为红色,这样子会让用户更加容易分辨,同时也让终端的显示更加的好看:

1
2
3
4
5
6
7
8
9
10
11
const chalk = require('chalk')
console.log(chalk.green('项目创建成功'))
console.log(chalk.red('项目创建失败'))
const ora = require('ora')
// 开始下载
const spinner = ora('正在下载模板...')
spinner.start()
// 下载失败调用
spinner.fail()
// 下载成功调用
spinner.succeed()

log-symbols(日志符号)

使用 log-symbols 在信息前面加上 √ 或 × 等的图标,优化视觉体验:

1
2
3
4
console.log(
symbols.success,
chalk.green('New project has been initialize successfully!')
)

handlebars

handlebars 可以对仓库的模板中的 package.json 文件做一些动态修改 :

1
2
3
4
5
6
7
8
9
10
11
12
{
"name": "{{name}}",
"version": "1.0.0",
"description": "{{description}}",
"scripts": {
"dev": "webpack-dev-server --config build/webpack.dev.conf.js",
"start": "npm run dev",
"build": "node build/build.js"
},
"author": "{{author}}",
"license": "ISC",
...

并在下载模板完成之后将用户输入的答案渲染到 package.json 中

1
2
3
4
5
6
7
8
9
const fileName = './package.json;'
const meta = {
name,
description: answers.description,
author: answers.author
}
const content = readFileSync(fileName).toString()
const result = handlebars.compile(content)(meta)
writeFileSync(fileName, result)

cli-table

表格

1
2
3
4
5
6
const table = new Table({
head: ['Template Name', 'Branch', 'Url'],
style: {
head: ['green']
}
})

配置下载模板

1
2
3
4
5
6
7
8
9
10
11
12
13
14
15
16
17
18
19
20
download('http://git.ym/g-web/mbs-cli.git#master', jay/${name}, {clone: true}, (err) => {
if(err){
spinner.fail();
console.log(symbols.error, chalk.red(err));
}else{
spinner.succeed();
const fileName = `${name}/package.json`;
const meta = {
name,
description: answers.description,
author: answers.author
}
if(fs.existsSync(fileName)){
const content = fs.readFileSync(fileName).toString();
const result = handlebars.compile(content)(meta);
fs.writeFileSync(fileName, result);
}
console.log(symbols.success, chalk.green('Project initialization completed'));
}
})

命令行交互

命令行交互功能可以在用户执行 init 命令后,向用户提出问题,接收用户的输入并作出相应的处理。使用 inquirer.js 实现。

1
2
3
4
5
6
7
8
9
10
11
12
13
14
15
16
17
18
19
20
21
22
23
24
25
26
27
28
29
30
31
32
33
34
35
36
37
38
39
40
41
42
43
44
45
46
47
48
49
50
51
52
53
54
55
56
57
58
59
60
61
62
63
64
65
66
let tplList = require(`${__dirname}/../templates`)

const questions = [
{
type: 'input',
name: 'project',
message: 'Project name:',
validate(val) {
if (val !== '') {
return true
}
return 'Project name is required!'
}
},
{
type: 'input',
name: 'author',
message: 'Please enter the author name:'
},
{
type: 'input',
name: 'description',
message: 'Please enter a description of the project:',
default: 'a project do for you'
},
{
type: 'input',
name: 'place',
message: 'Where to init the project:',
default: './'
}
]

module.exports = prompt(questions).then((answers) => {
const spinner = ora('Downloading template...')
spinner.start()
download(
`direct:${tplList['template1']['url']}#${tplList['template1']['branch']}`,
`${answers.place}/${answers.project}`,
{ clone: false },
(err) => {
if (err) {
spinner.fail()
console.log(symbols.error, chalk.red(err))
} else {
spinner.succeed()
const fileName = `${answers.project}/package.json`
const meta = {
name: answers.project,
description: answers.description,
author: answers.author
}
console.log(meta)
if (existsSync(fileName)) {
const content = readFileSync(fileName).toString()
const result = handlebars.compile(content)(meta)
writeFileSync(fileName, result)
}
console.log(
symbols.success,
chalk.green('New project has been initialize successfully!')
)
}
}
)
})

渲染模板

用 handlebars 的语法对 模板中的 package.json 文件做一些修改 :

1
2
3
4
5
6
7
8
9
10
{
"name": "{{name}}",
"version": "1.0.0",
"description": "{{description}}",
"scripts": {
"test": "echo \"Error: no test specified\" && exit 1"
},
"author": "{{author}}",
"license": "ISC"
}

并在下载模板完成之后将用户输入的答案渲染到 package.json 中

1
2
3
4
5
6
7
8
9
10
11
12
13
14
15
16
17
18
19
20
21
22
23
24
25
26
27
28
29
program
.version('1.0.0', '-v, --version')
.command('init <name>')
.action((name) => {
inquirer
.prompt([
{
name: 'description',
message: '请输入项目描述'
},
{
name: 'author',
message: '请输入作者名称'
}
])
.then((answers) => {
download('xxxxx#master', name, { clone: true }, (err) => {
const meta = {
name,
description: answers.description,
author: answers.author
}
const fileName = `${name}/package.json`
const content = fs.readFileSync(fileName).toString()
const result = handlebars.compile(content)(meta)
fs.writeFileSync(fileName, result)
})
})
})

这里使用了 node.js 的文件模块 fs,将 handlebars 渲染完后的模板重新写入到文件中。

视觉美化

在用户输入答案之后,开始下载模板,这时候使用 ora 来提示用户正在下载中:

1
2
3
4
5
6
7
8
const ora = require('ora');
// 开始下载
const spinner = ora('正在下载模板...');
spinner.start();
// 下载失败调用
spinner.fail();
// 下载成功调用
spinner.succeed();

简单版脚手架完整示例

1
2
3
4
5
6
7
8
9
10
11
12
13
14
15
16
17
18
19
20
21
22
23
24
25
26
27
28
29
30
31
32
33
34
35
36
37
38
39
40
41
42
43
44
45
46
47
48
49
50
51
52
53
54
55
56
57
#!/usr/bin/env node
const fs = require('fs');//系统内置模块 主要用来操作文件
const program = require('commander');//自动的解析命令和参数,用于处理用户输入的命令。
const download = require('download-git-repo');//下载并提取 git 仓库,用于下载项目模板。
const handlebars = require('handlebars');//模板引擎,将用户提交的信息动态填充到文件中。
const inquirer = require('inquirer');//通用的命令行用户界面集合,用于和用户进行交互。
const ora = require('ora');//下载过程久的话,可以用于显示下载中的动画效果。
const chalk = require('chalk');//给终端的字体加上颜色。
const symbols = require('log-symbols');//在终端上显示出 √ 或 × 等的图标。

program.version('1.0.4', '-v, --version')
.command('init <name>')
.action((name) => {
if(!fs.existsSync(name)){
inquirer.prompt([//prompt 提示
{
name: 'description',
message: 'Please enter a description of the project:'
},
{
name: 'author',
message: 'Please enter the author name:'
}
]).then((answers) => {
const spinner = ora('Downloading template...');
spinner.start();
/**
* 一级目录 name
* 二级目录 jay/${name}
*/
download('http://git.ym/g-web/mbs-cli.git#master', jay/${name}, {clone: true}, (err) => {
if(err){
spinner.fail();
console.log(symbols.error, chalk.red(err));
}else{
spinner.succeed();
const fileName = `${name}/package.json`;
const meta = {
name,
description: answers.description,
author: answers.author
}
if(fs.existsSync(fileName)){
const content = fs.readFileSync(fileName).toString();
const result = handlebars.compile(content)(meta);
fs.writeFileSync(fileName, result);
}
console.log(symbols.success, chalk.green('Project initialization completed'));
}
})
})
}else{
// 错误提示项目已存在,避免覆盖原有项目
console.log(symbols.error, chalk.red('Project already exists'));
}
})
program.parse(process.argv);

mbs-cli 核心命令

1
2
3
4
5
6
7
8
9
10
11
12
Commands:

add|a Add a new template
list|l List all the templates
init|i Generate a new project
create|c Generate a new project by choose a template
init simple|ins Generate a simple project

Options:

-h, --help output usage information
-V, --version output the version number

入口文件 mbs

1
2
3
4
5
6
7
8
9
10
11
12
13
14
15
16
17
18
19
20
21
22
23
24
25
26
27
28
29
30
31
32
33
34
35
36
37
38
39
40
41
42
43
44
45
46
47
48
49
50
51
52
53
#!/usr/bin/env node

process.env.NODE_PATH = __dirname + '/../node_modules/'

const { resolve } = require('path')
const chalk = require('chalk')
const { existsSync } = require('fs')
const symbols = require('log-symbols')
const program = require('commander')

const res = (command) => resolve(__dirname, '../commands/', command)

program.usage('<command>')

program.version(require('../package').version)

program
.command('add')
.description('Add a new template')
.alias('a')
.action(() => {
require(res('add'))
})

program
.command('init')
.description('Generate a new project')
.alias('i')
.action(() => {
require(res('init'))
})

program
.command('create')
.description('Generate a new project')
.alias('c')
.action(() => {
require(res('create'))
})

program
.command('list')
.description('List all the templates')
.alias('l')
.action(() => {
require(res('list'))
})

program.parse(process.argv)

if (!program.args.length) {
program.help() //如果没有输入参数,终端显示帮助
}

init 命令

1
2
3
4
5
6
7
8
9
10
11
12
13
14
15
16
17
18
19
20
21
22
23
24
25
26
27
28
29
30
31
32
33
34
35
36
37
38
39
40
41
42
43
44
45
46
47
48
49
50
51
52
53
54
55
56
57
58
59
60
61
62
63
64
65
66
67
let tplList = require(`${__dirname}/../templates`)

const questions = [
{
type: 'input',
name: 'project',
message: 'Project name:',
validate(val) {
if (val !== '') {
return true
}
return 'Project name is required!'
}
},
{
type: 'input',
name: 'author',
message: 'author name:'
},
{
type: 'input',
name: 'description',
message: 'description of the project:',
default: 'a simple spa project'
},
{
type: 'input',
name: 'place',
message: 'Where to init the project:',
default: './'
}
]

module.exports = prompt(questions).then((answers) => {
const spinner = ora('Downloading template...')
spinner.start()
download(
`direct:${tplList['template1']['url']}#${tplList['template1']['branch']}`,
`${answers.place}/${answers.project}`,
{ clone: true },
(err) => {
if (err) {
spinner.fail()
console.log(symbols.error, chalk.red(err))
} else {
spinner.succeed()
const fileName = `${answers.project}/package.json`
const meta = {
name: answers.project,
description: answers.description,
author: answers.author
}
console.log(meta)
if (existsSync(fileName)) {
console.log('come in...')
const content = readFileSync(fileName).toString()
const result = handlebars.compile(content)(meta)
writeFileSync(fileName, result)
}
console.log(
symbols.success,
chalk.green('New project has been initialize successfully!')
)
}
}
)
})

init simple 命令

1
2
3
4
5
6
7
8
9
10
11
12
13
14
15
16
17
18
19
20
21
22
23
24
25
26
27
28
29
30
31
32
33
34
35
36
37
38
39
40
41
42
43
44
45
let tplList = require(`${__dirname}/../templates`)

const question = [
{
name: 'description',
message: 'Please enter a description of the project:'
},
{
name: 'author',
message: 'Please enter the author name:'
}
]

module.exports = prompt(question).then((answers) => {
const spinner = ora('Downloading template...')
spinner.start()
download(
`direct:${tplList['template2']['url']}#${tplList['template2']['branch']}`,
`./${name}`,
{ clone: true },
(err) => {
if (err) {
spinner.fail()
console.log(symbols.error, chalk.red(err))
} else {
spinner.succeed()
const fileName = `${name}/package.json`
const meta = {
name,
description: answers.description,
author: answers.author
}
if (existsSync(fileName)) {
const content = readFileSync(fileName).toString()
const result = handlebars.compile(content)(meta)
writeFileSync(fileName, result)
}
console.log(
symbols.success,
chalk.green('Project initialization completed')
)
}
}
)
})

create 命令

1
2
3
4
5
6
7
8
9
10
11
12
13
14
15
16
17
18
19
20
21
22
23
24
25
26
27
28
29
30
31
32
33
34
35
36
37
38
39
40
41
42
43
44
45
46
47
48
49
50
51
52
53
54
55
56
57
58
59
60
61
62
63
64
65
66
67
68
69
70
71
72
73
74
75
76
77
78
79
80
81
82
83
84
85
86
87
88
89
let templateList = require(`${__dirname}/../templates`)
let rmTempList = require(`${__dirname}/../config/remote-templates`)

const choices = rmTempList.map((template) => {
return {
name: `${template.name} - ${template.description}`,
value: template.name
}
})

const questions = [
{
type: 'input',
name: 'project',
message: 'Project name:',
validate(val) {
if (val !== '') {
return true
}
return 'Project name is required!'
}
},
{
type: 'list',
name: 'template',
choices,
message: 'Choose template you want:',
validate(val) {
if (val !== '') {
return true
}
return 'template name is required!'
}
},
{
type: 'input',
name: 'author',
message: 'author name:'
},
{
type: 'input',
name: 'description',
message: 'description of the project:',
default: ''
},
{
type: 'input',
name: 'place',
message: 'Where to init the project:',
default: './'
}
]

module.exports = prompt(questions).then((answers) => {
const spinner = ora('Downloading template...')
spinner.start()
const template = rmTempList.filter((item) => {
return answers.template.includes(item.name) && item
})[0]
download(
`direct:${template.url}#${template.branch}`,
`${answers.place}/${answers.project}`,
{ clone: true },
(err) => {
if (err) {
spinner.fail()
console.log(symbols.error, chalk.red(err))
} else {
spinner.succeed()
const fileName = `${answers.project}/package.json`
const meta = {
name: answers.project,
description: answers.description,
author: answers.author
}
console.log(meta)
if (existsSync(fileName)) {
const content = readFileSync(fileName).toString()
const result = handlebars.compile(content)(meta)
writeFileSync(fileName, result)
}
console.log(
symbols.success,
chalk.green('New project has been initialize successfully!')
)
}
}
)
})

效果

1
2
3
4
5
6
7
8
9
10
11
12
13
14
$ mbs create

? Project name: demo
? Choose template you want: (Use arrow keys)
> vue-webpack-pc - 基于webpack构建的vue项目模板
react-webpack-pc - 基于webpack构建的react项目模板
angular-webpack-pc - 基于webpack构建的angular项目模板
discover your template - 更多海量模板等你发掘与收藏.
? Choose template you want: vue-webpack-pc - 基于webpack构建的vue项目模板
? Please enter the author name: jay
? Please enter a description of the project: a simple spa project
? Where to init the project: ./
√ Downloading template...
√ New project has been initialize successfully!

add 命令

1
2
3
4
5
6
7
8
9
10
11
12
13
14
15
16
17
18
19
20
21
22
23
24
25
26
27
28
29
30
31
32
33
34
35
36
37
38
39
40
41
42
43
44
45
46
47
48
49
50
51
52
53
54
55
56
57
58
59
60
61
62
const { prompt } = require('inquirer')
const { writeFile } = require('fs')
const { showTable } = require(`${__dirname}/../utils`)

let tempList = require(`${__dirname}/../templates`)

const question = [
{
type: 'input',
name: 'name',
message: 'Set the custom name of the template:',
validate(val) {
if (tempList[val]) {
return 'Template is existed!'
} else if (val === '') {
return 'Name is required!'
} else {
return true
}
}
},
{
type: 'input',
name: 'branch',
message: 'branch of the template:',
validate(val) {
if (val !== '') {
return true
}
return 'branch is required!'
}
},
{
type: 'input',
name: 'url',
message: 'Url of the template:',
validate(val) {
if (val !== '') {
return true
}
return 'Url is required!'
}
}
]

module.exports = prompt(question).then(({ name, branch, url }) => {
tempList[name] = {}
tempList[name]['branch'] = branch
tempList[name]['url'] = url

writeFile(
`${__dirname}/../templates.json`,
JSON.stringify(tempList),
'utf-8',
(err) => {
if (err) {
console.log(err)
}
showTable(tempList, 'New template has been added successfully!')
}
)
})

效果

1
2
3
4
5
6
7
8
9
10
11
$ mbs add

? Set the custom name of the template: template1
? branch of the template: master
? Url of the template: http://git.ym/Chenmh/bs-init-template.git
┌───────────────┬────────┬───────────────────────────────────────────┐
│ Template Name │ Branch │ Url │
├───────────────┼────────┼───────────────────────────────────────────┤
│ template1 │ master │ http://git.ym/Chenmh/bs-init-template.git │
└───────────────┴────────┴───────────────────────────────────────────┘
✔ New template has been added successfully!

mbs use download-git-repo to down load git repos. After answering 3 questions, you’ll add a new template to mbs.

list 命令

1
2
3
4
5
const { showTable } = require(`${__dirname}/../utils`)

let tempList = require(`${__dirname}/../templates`)

module.exports = showTable(tempList)
1
2
3
4
5
6
7
8
9
10
11
12
13
14
function showTable(tempList) {
const list = Object.keys(tempList)
if (list.length) {
list.forEach((key) => {
table.push([key, tempList[key]['branch'], tempList[key]['url']])
if (table.length === list.length) {
process.exit()
}
})
} else {
console.log(table.toString())
process.exit()
}
}

效果

1
2
3
4
5
6
7
8
9
$ mbs list

┌───────────────┬──────────┬───────────────────────────────────────────┐
│ Template Name │ Branch │ Url │
├───────────────┼──────────┼───────────────────────────────────────────┤
│ template1 │ standard │ http://git.ym/Chenmh/bs-init-template.git │
├───────────────┼──────────┼───────────────────────────────────────────┤
│ template2 │ simple │ http://git.ym/Chenmh/bs-init-template.git │
└───────────────┴──────────┴───────────────────────────────────────────┘

utils.js

1
2
3
4
5
6
7
8
9
10
11
12
13
14
15
16
17
18
19
20
21
22
23
24
25
26
27
28
29
30
31
32
33
const Table = require('cli-table')
const chalk = require('chalk')

const table = new Table({
head: ['Template Name', 'Branch', 'Url'],
style: {
head: ['green']
}
})

function showTable(tempList, Exp) {
const list = Object.keys(tempList)
if (list.length) {
list.forEach((key) => {
table.push([key, tempList[key]['branch'], tempList[key]['url']])
if (table.length === list.length) {
console.log(table.toString())
if (Exp) {
console.log(chalk.green(`\u2714 ${Exp}`))
}
process.exit()
}
})
} else {
console.log(table.toString())
if (Exp) {
console.log(chalk.green(`\u2714 ${Exp}`))
}
process.exit()
}
}

exports.showTable = showTable

#脚手架发布

npm 登录

1
2
3
4
5
PS D:\yameiproject\mbs-cli> npm login
Username: chenyumen
Password:
Email: (this IS public) 13172050157@126.com
Logged in as chenyumen on https://registry.npmjs.org/.

npm 发布

1
2
3
4
5
6
7
8
9
10
11
12
13
14
PS D:\yameiproject\mbs-cli> npm publish
npm notice
npm notice package: mbs-cli@1.0.4
npm notice === Tarball Contents ===
npm notice 573B package.json
npm notice 2.5kB index.js
npm notice 193B 脚手架.md
npm notice === Tarball Details ===
npm notice name: mbs-cli
npm notice version: 1.0.4
npm notice package size: 1.8 kB
npm notice total files: 3
npm notice
+ mbs-cli@1.0.4

本地 npm 模块调试

开启调试模式

npm link命令可以将一个任意位置的npm包链接到全局执行环境,从而在任意位置使用命令行都可以直接运行该 npm 包。

1
2
C:\Users\yamei\AppData\Roaming\npm\mbs -> C:\Users\yamei\AppData\Roaming\npm\node_modules\mbs-cli\bin\mbs
C:\Users\yamei\AppData\Roaming\npm\node_modules\mbs-cli -> D:\yameiproject\mbs-cli

关闭调试模式

如果你的项目不再需要该模块,可以在项目目录内使用 npm unlink 命令,删除符号链接

延申

1、丰富命令行交互,以适应更多变的需求。

2、webpack 配置文件隐藏优化。

模板集成常用功能

  • 登录、注销
  • DashBord
  • 表格
  • Tab 选项卡
  • 图表
  • 富文本编辑器
  • 三级菜单
  • 国际化
  • 图片拖拽、裁剪上传
  • 列表拖拽排序
  • 权限管理
  • 404/403/500

模板项目结构

├── build 构建服务和 webpack 配置
|—— build.js webpack 打包服务
|—— webpack.base.conf.js webpack 基本通用配置
|—— webpack.dev.conf.js webpack 开发环境配置
|—— webpack.prod.conf.js webpack 生产环境配置
├── config 构建项目不同环境的配置
├── public 项目打包文件存放目录
├── index.html 项目入口文件
├── package.json 项目配置文件
├── .babelrc babel 配置文件
├── .gitignore git 忽略文件
├── postcss.config.js postcss 配置文件
├── src 项目目录
├── assets 静态资源
├── components 集成组件目录
|—— json json 目录
|—— lang 中英文目录
|—— router vue 路由配置
|—— service ajax 请求配置
|—— store vuex 配置
|—— styles 公共样式
|—— utils 工具类
|—— views 页面组件目录
|—— App.vue vue 实例入口
|—— main.js 项目构建入口

分享到:
network