
为什么需要脚手架?
1、减少重复性的工作,不再需要复制其他项目再删除无关代码,或者从零创建一个项目和文件 。
2、根据交互动态生成项目结构和配置文件,具备更高的灵活性和人性化定制的能力 。
3、多人协作更为方便,避免了人工传递文件的繁琐。
4、集成互联网上的模板,方便自己与他人使用。
思路
开发脚手架可以借鉴 vue-cli 的基本思路。vue-cli 是将项目模板放在 git 上,运行的时候再根据用户交互下载不同的模板,经过模板引擎渲染出来,生成项目。这样讲脚手架和模板分离,就可以各自维护,即使模板有所变动,只需要上传最新的模板即可,而不需要用户去更新脚手架就可以生成最新的项目。
脚手架工作流

脚手架问答流
PS D:\test> vue create demo1
1 | ? Please pick a preset: Manually select features |
如何搭建一个脚手架?
第三方库的支持
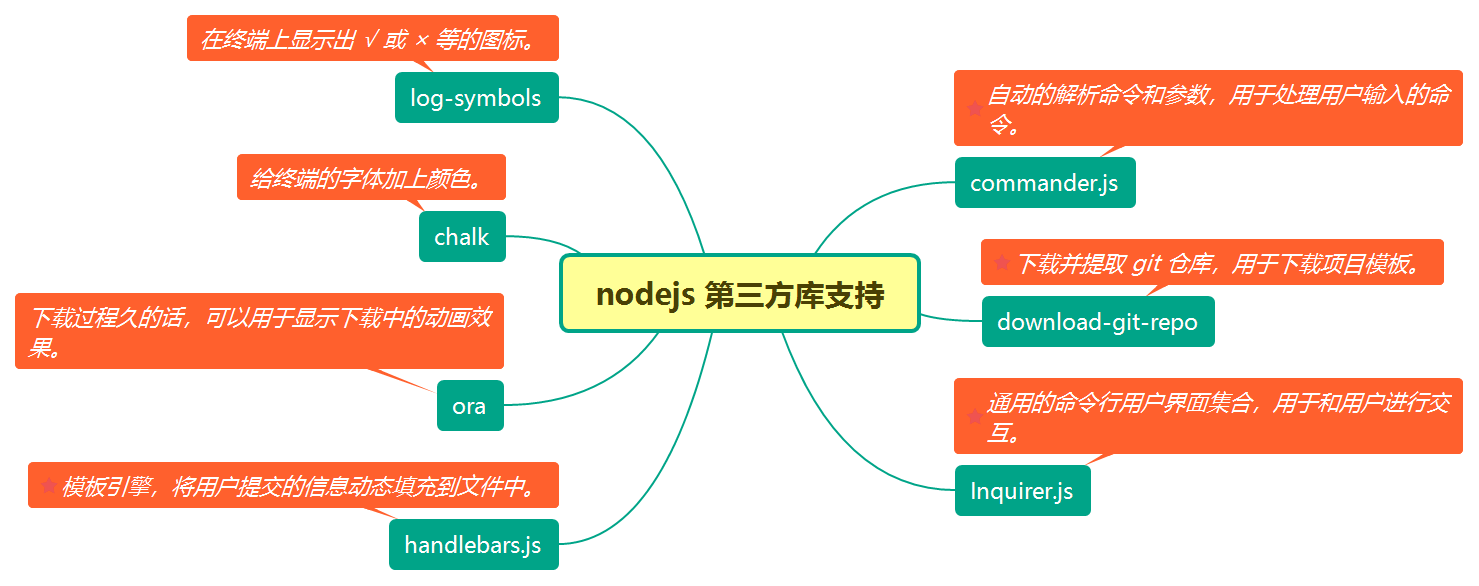
会使用到的第三方库
- commander.js:可以自动解析命令和参数,用于处理用户输入的命令
- download-git-repo:下载并提取 git 仓库,用于下载项目模板
- inquirer.js:通过命令行用户界面集合,用于和用户进行交互
- handlebars.js:模板引擎,将用户提交的信息动态填充到文件中
- ora:下载过程久的话,可以用于显示下载中的动画效果
- chalk:可以给终端的字体加上颜色
- log-symbols:可以在终端上显示 √ 或 × 等图标
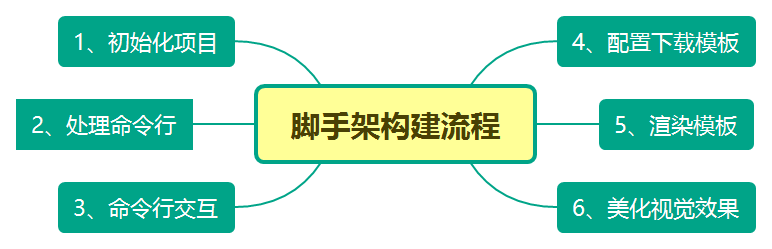
搭建步骤:
初始化项目
首先创建一个空项目,命名为 mbs-cli,然后新建一个 bin/mbs 文件,再执行 npm init 生成一个 package.json 文件。最后安装上面需要用到的依赖。
1 | npm install commander download-git-repo inquirer handlebars ora chalk log-symbols cli-table -S |
处理命令行
node.js 内置了对命令行操作的支持,在 package.json 中的 bin 字段可以定义命令名和关联的执行文件。
在 package.json 中加上 bin 的内容:
1 | { |
首先在 mbs 文件 中引入相关依赖模块:
1 |
|
配置 !/usr/bin/env node 的作用
指定用 node 执行脚本文件 ,usr/bin/env 解决了不同的用户 node 路径不同的问题,可以让系统动态的去查找 node 来执行你的脚本文件。
nodejs 依赖模块介绍与用法
commander(指挥官)
自动地解析命令和参数,用于处理用户输入的命令。
usage(): 设置 usage 值
command(): 定义一个命令名字
description(): 设置 description 值
option(): 定义参数,需要设置“关键字”和“描述”,关键字包括“简写”和“全写”两部分,以”,”,”|”,”空格”做分隔。
parse(): 解析命令行参数 argv
action(): 注册一个 callback 函数
version() : 终端输出版本号
1 | PS D:\yameiproject\mbs-cli> mbs --help |
定义常规命令:
1 | const program = require('commander') //自动的解析命令和参数,用于处理用户输入的命令。 |
init 命令逻辑:
1 | program |
处理用户输入命令:
1 | program |
最后处理解析命令行参数 :
1 | program.parse(process.argv) |
inquirer(询问者)
通用的命令行用户界面集合,用于和用户进行交互。由于交互的问题种类不同,inquirer 为每个问题提供很多参数:
1 | type:表示提问的类型,包括:input, confirm, list, rawlist, expand, checkbox, password, editor; |
语法结构
1 | const inquirer = require('inquirer') |
input 类型
1 | const inquirer = require('inquirer'); |
效果:
confirm 类型
1 | const promptList = [ |
效果:
list 类型
1 | const promptList = [ |
效果:
download-git-repo
download-git-repo 支持从 Github、Gitlab 和 Bitbucket 下载仓库,
1 | download(repository, destination, options, callback) |
repository
1 | - GitHub - github:owner/name or simply owner/name |
destination
1 | The file path to download the repository to. xxxxxxxxxx |
options
1 | boolean default false - If true use git clone instead of an http download. While this can be a bit slower, it does allow private repositories to be used if the appropriate SSH keys are setup. |
callback
1 | The callback function as function (err). |
example:
1 | download('direct:https://gitlab.com/flipxfx/download-git-repo-fixture/repository/archive.zip', 'test/tmp', function (err) { |
ora (loading 动效)
用于显示下载中的动画效果
1 | const ora = require('ora') |
1 | \ Downloading template... |
chalk(字体颜色)
通过 chalk 来为打印信息加上样式,比如成功信息为绿色,失败信息为红色,这样子会让用户更加容易分辨,同时也让终端的显示更加的好看:
1 | const chalk = require('chalk') |
log-symbols(日志符号)
使用 log-symbols 在信息前面加上 √ 或 × 等的图标,优化视觉体验:
1 | console.log( |
handlebars
handlebars 可以对仓库的模板中的 package.json 文件做一些动态修改 :
1 | { |
并在下载模板完成之后将用户输入的答案渲染到 package.json 中
1 | const fileName = './package.json;' |
cli-table
表格
1 | const table = new Table({ |
配置下载模板
1 | download('http://git.ym/g-web/mbs-cli.git#master', jay/${name}, {clone: true}, (err) => { |
命令行交互
命令行交互功能可以在用户执行 init 命令后,向用户提出问题,接收用户的输入并作出相应的处理。使用 inquirer.js 实现。
1 | let tplList = require(`${__dirname}/../templates`) |
渲染模板
用 handlebars 的语法对 模板中的 package.json 文件做一些修改 :
1 | { |
并在下载模板完成之后将用户输入的答案渲染到 package.json 中
1 | program |
这里使用了 node.js 的文件模块 fs,将 handlebars 渲染完后的模板重新写入到文件中。
视觉美化
在用户输入答案之后,开始下载模板,这时候使用 ora 来提示用户正在下载中:
1 | const ora = require('ora'); |
简单版脚手架完整示例
1 |
|
mbs-cli 核心命令
1 | Commands: |
入口文件 mbs
1 |
|
init 命令
1 | let tplList = require(`${__dirname}/../templates`) |
init simple 命令
1 | let tplList = require(`${__dirname}/../templates`) |
create 命令
1 | let templateList = require(`${__dirname}/../templates`) |
效果
1 | $ mbs create |
add 命令
1 | const { prompt } = require('inquirer') |
效果
1 | $ mbs add |
mbs use download-git-repo to down load git repos. After answering 3 questions, you’ll add a new template to mbs.
list 命令
1 | const { showTable } = require(`${__dirname}/../utils`) |
1 | function showTable(tempList) { |
效果
1 | $ mbs list |
utils.js
1 | const Table = require('cli-table') |
#脚手架发布
npm 登录
1 | PS D:\yameiproject\mbs-cli> npm login |
npm 发布
1 | PS D:\yameiproject\mbs-cli> npm publish |
本地 npm 模块调试
开启调试模式
npm link命令可以将一个任意位置的npm包链接到全局执行环境,从而在任意位置使用命令行都可以直接运行该 npm 包。
1 | C:\Users\yamei\AppData\Roaming\npm\mbs -> C:\Users\yamei\AppData\Roaming\npm\node_modules\mbs-cli\bin\mbs |
关闭调试模式
如果你的项目不再需要该模块,可以在项目目录内使用 npm unlink 命令,删除符号链接
延申
1、丰富命令行交互,以适应更多变的需求。
2、webpack 配置文件隐藏优化。
模板集成常用功能
- 登录、注销
- DashBord
- 表格
- Tab 选项卡
- 图表
- 富文本编辑器
- 三级菜单
- 国际化
- 图片拖拽、裁剪上传
- 列表拖拽排序
- 权限管理
- 404/403/500
模板项目结构
├── build 构建服务和 webpack 配置
|—— build.js webpack 打包服务
|—— webpack.base.conf.js webpack 基本通用配置
|—— webpack.dev.conf.js webpack 开发环境配置
|—— webpack.prod.conf.js webpack 生产环境配置
├── config 构建项目不同环境的配置
├── public 项目打包文件存放目录
├── index.html 项目入口文件
├── package.json 项目配置文件
├── .babelrc babel 配置文件
├── .gitignore git 忽略文件
├── postcss.config.js postcss 配置文件
├── src 项目目录
├── assets 静态资源
├── components 集成组件目录
|—— json json 目录
|—— lang 中英文目录
|—— router vue 路由配置
|—— service ajax 请求配置
|—— store vuex 配置
|—— styles 公共样式
|—— utils 工具类
|—— views 页面组件目录
|—— App.vue vue 实例入口
|—— main.js 项目构建入口


